

How to Create Variations of Tricks for Dancers Who Move Differently
By Jody Ryker
Not long ago, I dropped into a pole class when I was out of town. Whenever possible, I always drop into different pole studios when traveling. I enjoy getting a chance to connect with other pole people (which is the easiest way for me to socialize), learn something new (a new trick, a new way of teaching a trick, conditioning drills, choreo, etc.), and get on a pole when I don’t have access to my own equipment. This particular class was an intermediate spin class. The combo that was taught began with a thread-through transition. This is one of those movements that many beginners can easily perform, and yet for some bodies (like mine), it may be difficult, even as an advanced trickster. I have a hip impingement which limits my ability to move my knee towards my chest, so I struggled with thread-throughs for years. However, like many of these transitions, I’d worked on this particular thread-through before and have found a variation that feels good for my body, doesn’t cause pain, and allows me to maintain my flow through a combo including it as a transition. As the instructor moved around the room and came to me, she watched my adaptation of the thread-through. She quickly started shouting at me “No!” and proceeded to direct me to perform the movement exactly the way her body allowed her to do the movement. Since I’ve been dancing for over a decade, this is something I’ve experienced many times, and I’m used to accommodating my own body and having to assert myself with instructors like her, so I quickly explained that I have a hip impingement, and this is how I need to move to avoid pain. She dropped it, and then seemed to ignore me for the remaining part of class. I didn’t feel included, and I didn’t feel like the instructor wanted to teach me. Many students have experiences like this, especially students who do not fit the description of the stereotypical dancer (I include myself in this group). I’d like to share some teaching strategies that instructors can use to be more inclusive, as well as strategies for dancers to learn how to adapt skills for their bodies if their instructor cannot help them do this.
Inclusive vs. Non-Inclusive Coaching Styles
Does your coach only teach students like them or can they also teach students who move differently?
The anecdote I shared from the spin class I recently dropped into is an example of a pervasive yet non-inclusive coaching style where the instructor only teaches students to move and perform skills exactly like them. Many new instructors start out this way (I’m sure I did this to some extent too), because they don’t have the experience or knowledge to understand how to adapt moves to different bodies. They may not really even know how they are able to do a move. I don’t think this makes these instructors automatically terrible, however, I do think these coaches aren’t capable of teaching very many students effectively and safely. If instructors don’t allow students to move differently than them, this can also increase the chance of injury for students with different ranges of motion, strength, etc. Some coaches will even physically force their students into positions (yes, this has happened to me, and it resulted in pain and no progress). This coaching style also limits some students from progress and even from creating new moves. Many of the tricks I’ve created are from adapting a move to my body which then leads me to finding new shapes and transitions.
Learning how to adapt moves requires experience with a wide-range of students as well as some knowledge about biomechanics and anatomy. It’s a lifelong journey because we will always encounter new students who move a bit differently than ourselves or any previous student we’ve had. An experienced coach can likely still problem-solve a skill with a student who has a different limiting factor than any previous student they’ve worked with, though some experimentation and research may be required to develop an optimal pathway for this student. I always like to share with my students about how my own body moves and how other dancers may move or bend in a different way so my students can start to understand how they may need to move differently than me. If you’re a student, I also recommend that you train with at least one instructor who moves similarly to you or may have had similar movement challenges, as they will likely have more insight into how to vary moves in a way that will work best for you.
As a coach, I try to help students learn how their body moves best. This is the first step towards developing tools so the student can figure out how to adapt moves on their own or with my help. Since many coaches still adhere to more traditional methods of instruction such as only allowing students to perform a skill one way, and because many teachers just don’t have the experience yet to know how to adapt moves, I share my method for modifying tricks with my students so they can find variations for themselves.
Learn About Your Body
How does your body move optimally?
The first step to adapting moves to your or your student’s body is to understand how your or their body moves optimally. What do I mean by “moving optimally”? Here are some things I think about during my own training and while coaching students: how can the dancer move to maximize their strength or flexibility? What movements feel good for them? How can they move without feeling pain? Note that feeling pain isn’t necessarily a bad thing, but training through pain without determining whether it’s a productive pain or not could lead to negative consequences (if you’re interested in learning more about this, I recommend listening to Dr. Jen Hosler’s podcast “Movement Upgraded,” episodes “Stress & Pain” Parts 1 and 2). If you’re not sure whether pain is productive or not, talk to an experienced coach or physio!
If you or your student are new to pole or athletics in general, then you or your student will need to move in as many ways as are currently possible to start learning about your or their body. If the dancer is coming from another sport or physical discipline, then begin analyzing movements from that as a starting point. Either way, it’s also helpful to start noticing how seemingly simple, everyday movements are performed: how does the dancer stand up from sitting? How do they pick up an object from the floor? How do they look behind themselves? If you are analyzing your own movement, I always recommend filming, as often we think we’re moving a certain way when in reality we’re moving differently. If a movement is asymmetrical, film yourself doing it on each side. Identifying asymmetries in our movement patterns (we all have them) can sometimes be the missing puzzle piece when troubleshooting moves. Keep in mind that most people move a bit differently when they’re being watched, even when it’s just a camera “watching” them. If possible, try to get a video of yourself when you’re not thinking about being filmed. If you are interested in learning more about identifying your movement patterns, I really like Colleen Jolly’s new book “Mobility for Pole.”
Describing Movement & Body Positions
Next, try to describe the movement patterns you see. I learned relevant anatomical terms for this purpose. This isn’t a requirement, but I like having a structured language for thinking about movement. Also, if you find these types of descriptions helpful, I highly recommend Neola Wilby’s book “Pole Anatomy.” Many of the terms I use most frequently describe joint positions. For example:
- Shoulder: external rotation (“wrap armpits”or “face armpits towards each other”), internal rotation (armpits facing out), flexion (arms overhead), extension
- Hip: external rotation, (“turn out”), internal rotation, flexion (knee towards chest), extension
- Spine: flexion (“rounding the spine”), extension (arch or backbend), thoracic rotation, lateral flexion (side bend)
Depending on the main joints used in the skill you’re working on, it may be helpful to learn more than just the terms listed above. For example, learn wrist positions for analyzing handstands. The list above is just a general starting point, as it’s difficult to find a pole skill that doesn’t involve the spine, hip, and shoulder! If you find it helpful to understand movement with terms like these, then I encourage you to look up each of these terms and view images of different bodies in these positions. Especially if you’re a coach, it’s important to familiarize yourself with how different these positions can look on different dancers. I also suggest trying out each position on yourself and take note of how it looks and how it feels. This will deepen your understanding of the position, ability to identify it, and cue students. Note also that many of these joint positions look different depending on how the rest of the body is positioned relative to the joint. For example, if you’re only familiar with shoulder external rotation in flexion, then you may not be able to correctly identify external rotation on a bent and abducted arm (looks like a goal post position). As another learning exercise, try to explore joint positions in as many ways as are accessible to you.
Additionally, you may find it helpful to learn the names of the main bones and muscles used in skills you’re working on or teaching. Here are some that I use regularly:
- Bones: humerus, ulna, radius, clavicle (collar bone), sternum, scapula (shoulder blade), lumbar spine, thoracic spine, cervical spine, femur, tibia, fibula
- Muscles (there are more than 600 in the body, so these are just a starting point. Note that some of these names refer to a collection of muscles, such as the rotator cuff): hamstrings, quadriceps, biceps, triceps, rotator cuff, hip flexors, gluteus medius, gluteus maximus, serratus anterior, trapezius (upper, middle, lower), latissimus dorsi, erector spinae, rectus abdominis, obliques, transverse abdominis
Sometimes identifying a muscle and where it is on our body, can help us feel and activate it as well as determine which muscle(s) we’re using when performing a skill. Knowing the main mover muscle involved in a particular skill can also help you cue yourself or a student, such as “squeeze your glute” to extend your hip. I’ve intentionally left out definitions of these terms, as this blog isn’t intended to be an anatomy lesson. I’ve learned most of these terms as needed while troubleshooting a skill. For example, it’s helpful to learn about the attachment points (origin and insertion) and main functions of the hamstrings, quads, glutes, and hip flexors when analyzing splits. In the examples at the end of this blog, I will mostly discuss differences in joint positions (otherwise this blog would have been twice as long!). However, different dancers may also rely on different muscles to perform skills, so this is the next layer of movement analysis.
Next, start describing the movement patterns you see using some of the terms describing joint positions and names of bones, or using another system that makes sense to you. After that, perform the movement multiple times (or have your student do this) and try to identify what muscles you (or your student) feel activating or doing the majority of the movement. If you’re a coach, you can watch for contractions of specific muscles (easier if the student is wearing fitted clothes or a more skin-baring costume) and ask the student to describe or point to where they feel a muscle engaging. Here’s one example of how a movement can be performed with different muscular engagement: when I was working on a drill for my shoulder external rotation, I felt my lats fire up. However, my goal for this exercise was to strengthen my rotator cuff, not my lats, so I had to learn to relax my lats to give my rotator cuff muscles a chance to work. Note that it is very common for the bigger, mover muscles to sort of take over a movement which results in the deeper stabilizing muscles to weaken. This not only may increase the chance of injury, it also creates a sub-optimal pathway: If the stabilizing muscles do their job, the bigger mover muscles can focus their strength on the actual movement, making it stronger.
My Movement Patterns: An Example Description
I’ll share a bit about some of my movement patterns as an example. My hips like to internally rotate (turn in), but that’s about it (all other hip movements are somewhat restricted). Hip flexion (knees to chest) often causes pinching in my hips, which is not a productive type of pain. Because of this, I never flex into this sensation. Over the last couple years, I was able to slightly decrease my impingement through strengthening my hip rotators, so my range has increased a bit. Since my hip extension is also limited, I achieve positions like splits by using my lumbar (low back) extension. My right lateral flexion (side bend) range is greater than my spinal extension, so I often perform right contortion grabs (a way of grabbing one’s foot to pull it to one’s head) by side-bending to my foot and then rotating into spinal extension. I have many asymmetries, which can mostly be summed up in my left side joints generally having less range of motion than my right side joints (including shoulder flexion, lateral flexion, and all hip positions). My shoulder flexion range combined with my shoulder strength in end-range flexion is one of my movement assets, and I often use it to create my most backbendy shapes instead of relying more on spinal extension. For example, I’ll often perform a hollowback shape instead of a traditional contortion shape, which to the untrained eye may look nearly the same.
What’s Optimal For Your Current Body May Not Be Your Future Body’s Optimal Pathway
Identify your weaknesses to create more pathways and access more skills
It’s important to note that we sometimes develop movement patterns that are not optimal, and it is always in our best interest to have access to as many movement pathways as possible. For example, I noted that my hip extension is limited. When I am trying a new split trick, my current body can probably only do it if I can find a way to allow my low back to achieve most of the extension. However, I am working on increasing my hip extension so I have more options for these types of movements. Is my current movement pattern optimal for my current body? Provided that I don’t push into a pinchy, or crunchy feeling in my low back, then generally yes, it is. Would a future me perform these split tricks more optimally using more hip extension than lumbar extension? Certainly for many split skills, but that’s not an option for me now. Keep in mind that sometimes our current body cannot perform certain moves safely yet, and a good coach can help you determine this as well as offer a safe alternative that does work for your body now. Note that this blog is not about how to determine your readiness for a specific skill, just how to find a more optimal variation of a skill that may be safer for you to do now.
If you’re a coach, you can also use the methods I’ve outlined to analyze your students’ movement patterns. You can use this information to identify the best pathway to recommend to each student when troubleshooting a skill and also to determine the best variation of a trick to first teach your students. Additionally, I also assess a student’s range of motion, strength, and stability in relevant joints and while they are grounded before teaching them new skills.
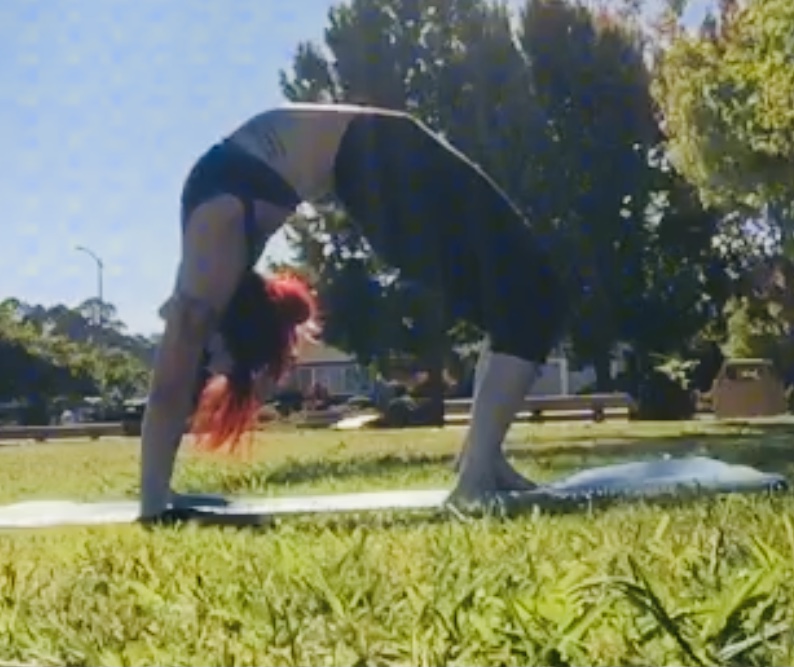
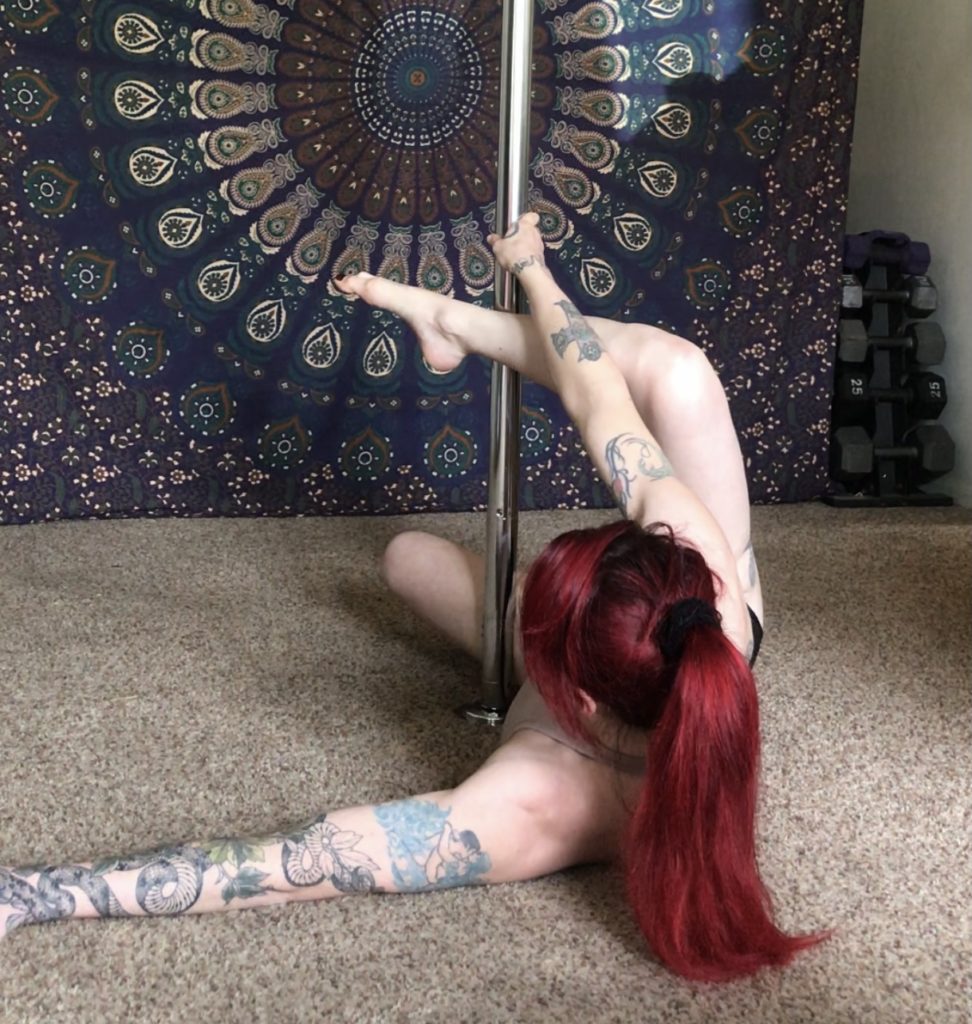
Example: Cradle Thread-Through to Superman
Thread-through transitions are common examples of pole skills that often need to be adapted for different dancers. I don’t think I’ve ever taught a class where every student was able to perform the thread-through transition exactly the same way. Most of the common thread-throughs require a significant amount of hip flexion. Additionally, the dancer sometimes needs to use the strength of their legs to achieve this flexion actively versus relying on an external force (such as guiding the leg through with their hand) for the movement. While the cradle thread-through to superman does require both hands on the pole (ok, now that I said it, I’m thinking about how I could not use both hands on the pole, though it may no longer be a thread-through….), there are some thread-throughs that can be adapted so the student can use one hand to assist their leg movement, but this only works if the starting pose isn’t already using both hands in some essential way. Any student with a hip impingement will likely have some challenges with thread-throughs. Never push yourself or a student to move into a joint range that causes pinching! This is a non-productive pain and pushing through it could even lead to a set-back.
Leg thread-throughs can often be done either in hip external or internal rotation. Many people are stronger in one of these directions, and they will likely prefer to use the position they are stronger in, and doing it any other way may not even be possible yet for them. You can always assess your or your student’s internal and external rotation range to get an idea before working on this thread-through. I always have my students try a similar thread-through on the floor and observe whether they naturally do the thread-through knee first (internal rotation most likely) or foot first (likely external rotation). Note also that if hip movements are limited, the student will probably naturally use their spine in some way to compensate for this. For example, I often use my thoracic rotation or lateral flexion to make my hip movements appear bigger, and this can assist with thread-throughs as well.
There are other adaptations that different dancers use as well. For example, look at the spacing between their hands while setting up and performing this thread-through. Dancers with less hip flexion may need more space, which can be achieved with hands closer together. However, this requires more strength to hold, as is often the case when the limiting factor is range of motion. Students with weaker grip strength may need to have their hands farther apart which is lighter but requires more hip flexion. It’s not possible to list all adaptations, and I still see dancers performing skills I’ve seen hundreds of times but in a slightly different way than I’ve ever noticed before.
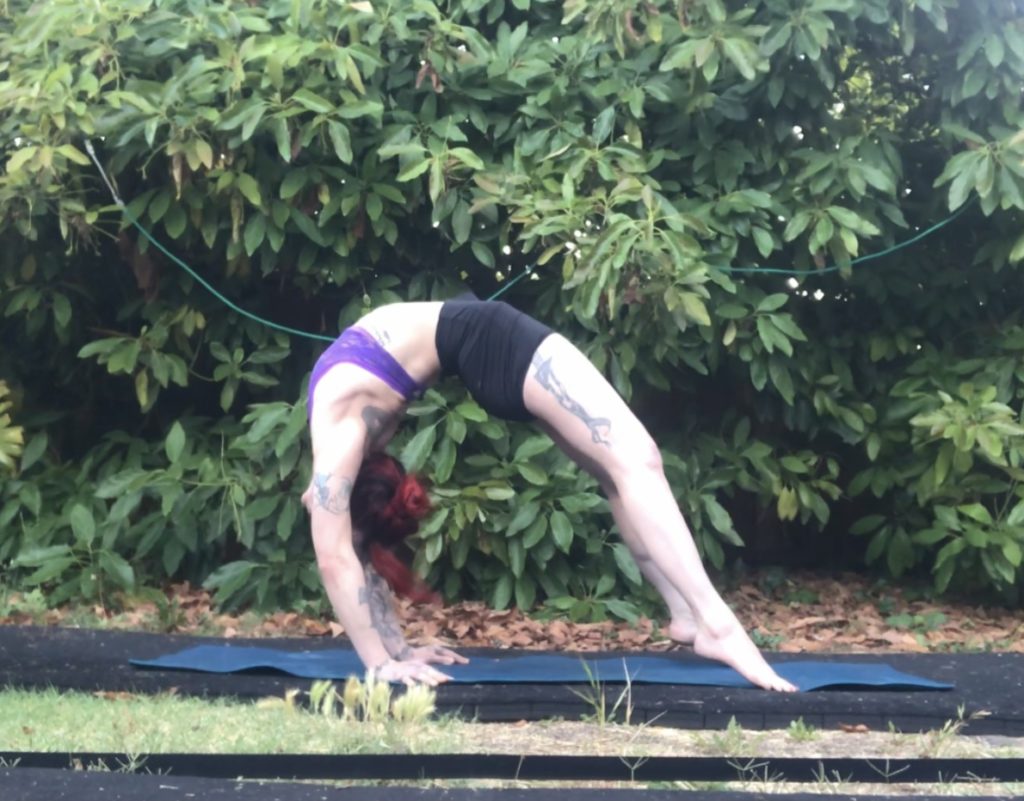
Example: Eagle
Flexibility moves are also great examples to analyze, as there are many subtle variations (and not so subtle) that different bodies do in order to perform essentially the same bendy shape. The ballerina pole trick is a great example of this, and I recently broke this skill down in one of my workshops (Appreciating Diverse Bodies in Pole Dance). Eagle is an even bendier variation of ballerina, as the dancer is essentially performing a needle scale while wrapped around the pole, which requires some variation of contortion grab to raise the foot towards and past the head.
Let’s start with some of the variations of joint positions in eagle that can be similarly adapted in ballerina, such as the position of the pelvis. The leg wrapped around the pole requires the corresponding hip to flex, and the other hip must be in extension. This is a similar position to splits, though both legs are bent. How do you like to perform splits? Are your splits square (hip bones both pointing forward, in the same direction as the front leg)? Are they always open (pelvis rotated tonwards the back leg, so that the hip bones are no longer pointing in the same direction as the front leg)? If a dancer keeps their hips more square then it will generally make it easier for them to grab their free leg. If their hips opens, then their back leg will start to point or turn away from their free hand as they try to grab it. This is true in ballerina and even more noticeable in eagle which includes the more extreme contortion grab.
Next, the position of the rib cage or chest can also vary. If the shoulders are pointing in the same direction as the hip bones, and if the hips are square, then the dancer is using spinal extension (backbend) to achieve the shape. If the shoulders are pointing in a different direction than the hip bones, then the dancer is using thoracic rotation, and likely some lateral flexion (side bend) to achieve the shape.
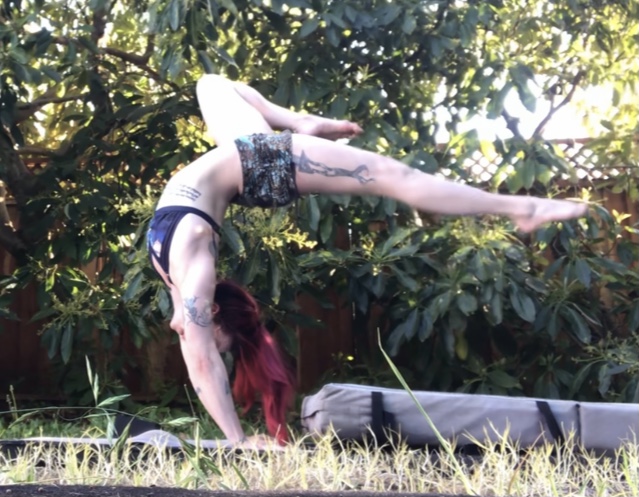
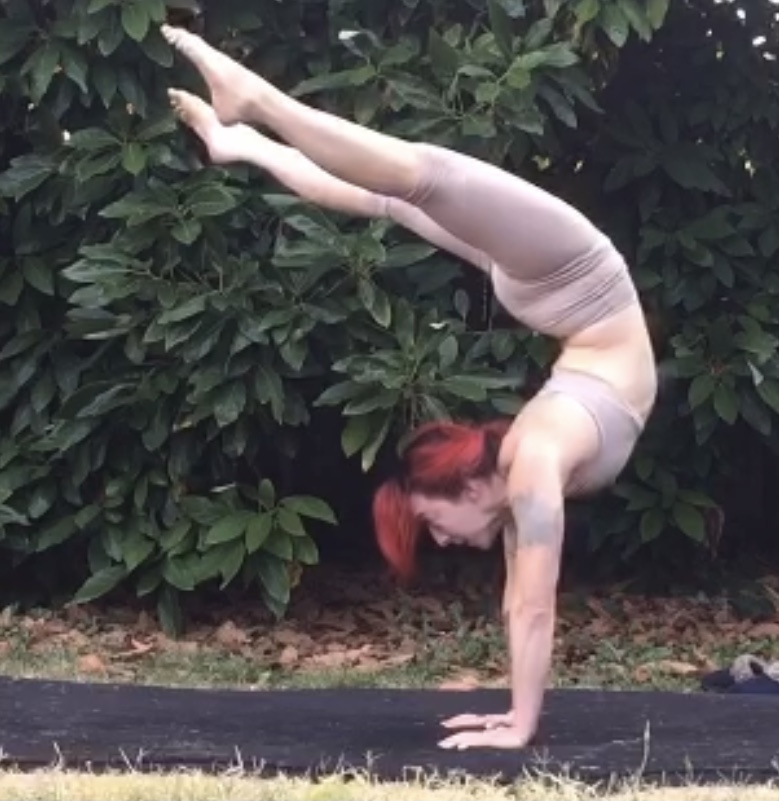
Third, look at the shoulders. This part of the discussion is specific to eagle, not ballerina. When arms are overhead, it is most stable for the shoulders to be externally rotated (armpits facing each other versus facing out). Maintaining external rotation keeps the rotator cuff (some of the shoulder stabilizers) engaged and makes space in the joint, decreasing the chance of impingement. For most dancers, facing the armpits out is not ideal. If the eagle position is on the edge of someone’s flexibility, especially their shoulder flexibility, keep an eye out for internal rotation in their shoulders, as it is a common but not recommended compensation to try to get a bit more flexion range. For most bodies, this increases the chance of a shoulder injury. It’s a good idea to be able to catch if a dancer is doing this at all. Either way, I always warm-up for backbend shapes and pole (and handstands!) with an exercise for strengthening the external rotators. Another subtle variation to note is that some dancers will perform eagle using more shoulder flexion, while others will slightly close their shoulder angle and instead achieve the shape using more extension in their upper back. Neither is better than the other, but if a student has great shoulder flexion, then they can focus on increasing their upper back extension if they want to increase their backbend, and vice versa. Note that the position of the head sometimes gives this away. If the head is more towards the chest, this would likely indicate more shoulder flexion, as in a hollowback shape. If the head is pulling through the arms and towards the butt, this may indicate more upper back extension and a decreased shoulder flexion angle. This isn’t an absolute rule, though, so look at the shoulder angle to confirm!
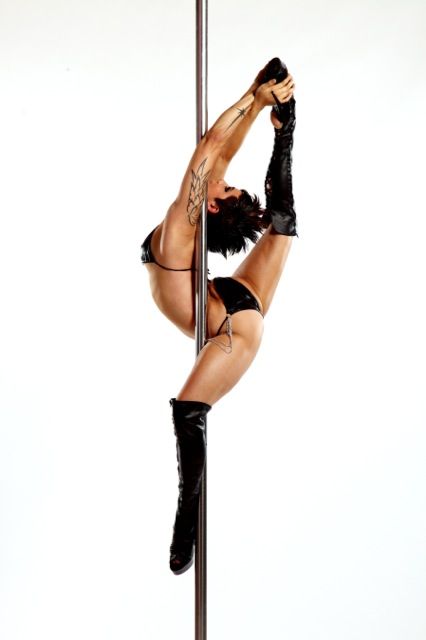
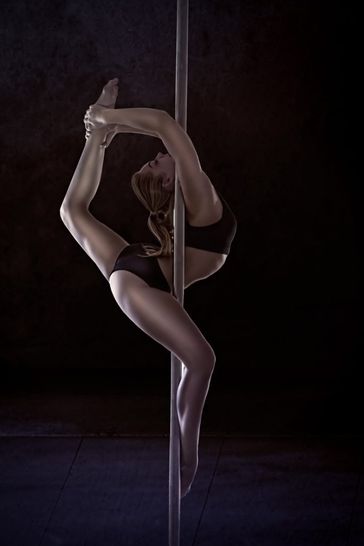
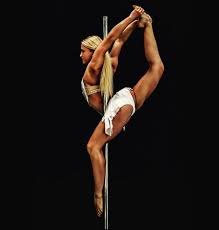
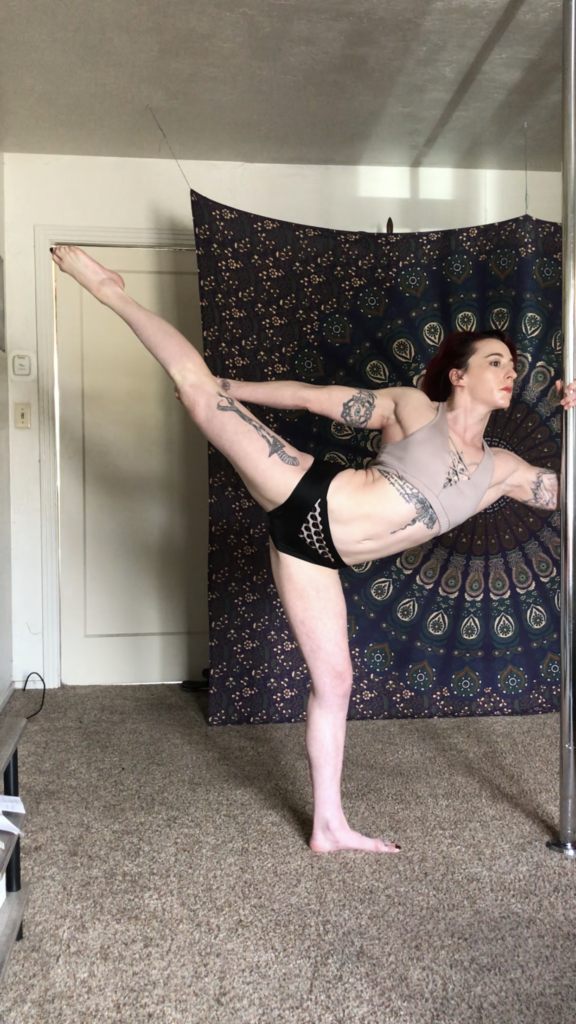
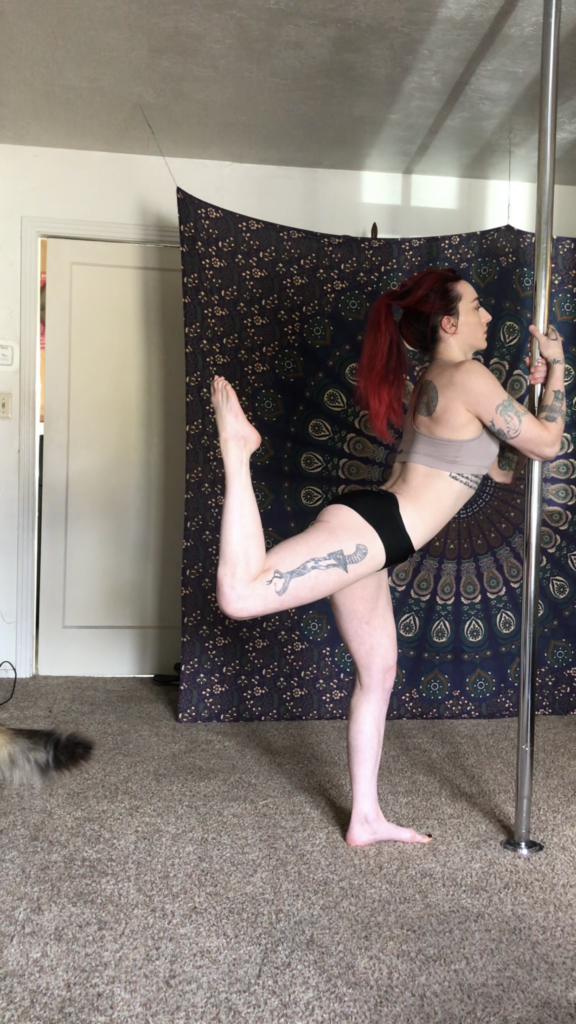
Take a look at the three images of different dancers performing eagle, and describe any differences you see. Which dancer has the most open hips? The one in image 2. The other two dancers appear more square than not, though seeing the shape from more angles could confirm this. Which dancer is using shoulder flexion for the overhead grab versus more upper back extension? The dancer in image 3, and because their head is pulling through their arms and towards their chest, this is more obvious. Do you notice anything else? It appears that the dancer in image 2 is using the most spinal extension, and it’s fairly uniform throughout their back, while the other two appear to be using slightly more hip extension (more of an oversplits position) to achieve the shape.
There are many other things that can vary as well. For example, the leg wrap. The traditional ballerina and eagle have one leg bent, externally rotated, and wrapped around the pole. This really locks in the position and the dancer has a good amount of skin contact on the pole. However, for those with limited hip external rotation (like me), there are some other positions that can be tried, though they’re slightly harder to lock in. The foot doesn’t have to wrap around the pole, instead the dancer can just rely on the inner thigh hold (very challenging to achieve the contortion grab in this position though). I like straightening this leg and using a foot sickle around the pole, and this is the first eagle type shape that I was able to achieve.
There are also different entries that will likely be easier for some dancers and harder for others. Notice that in the video above where I perform the foot sickle variation, my entry relies on a deep side bend in order for me to secure my foot. I also didn’t fully rotate out of this side bend here (though that’s an option as well). Anyone attempting the full eagle should also be training needle scales on the ground. How do you grab your foot for a needle scale? I often figure out how best to get into a bendy shape up the pole by first analyzing how I get into it on the ground. Like many pole moves, the pole will likely limit some of your ranges of motion as you’re setting up for eagle. I get into the standard eagle shape by securing the pole with my upper back and neck, which significantly limits my lateral flexion. Whether attempting eagle or another pole trick, try as best as you can to replicate your entry position on the ground and then figure out how you need to move around the pole (and without losing any essential points of contact) to complete the shape.
Wrapping Up
The next time you try a new pole shape (or teach one if you’re a coach), I’d recommend going through the following steps yourself or having your student go through these:
- Try the shape on the floor. If you can’t get into it yet while grounded, then you may need to try a variation of the trick that matches what you are able to achieve on the ground. Remember to consider how the pole may limit your movement up in the air. Consider filming this attempt from different angles for more information as well.
- Describe the position you are able to achieve on the floor. I like to use some of the relevant anatomical terms I listed earlier, but you can use any descriptors that make the most sense to you. If you aren’t yet able to get into the shape you want, this may help you identify your limiting factor(s). For example, maybe your shoulders can’t quite achieve 180 degrees of flexion. Once you identify this, then you can start working on drills to address your limiting factor.
- Next, try to replicate your floor shape up the pole. Keep in mind what pathways your body has access to in order to accomplish this shape. Are you starting in a position that allows you to take one of these pathways? If not, can you change your starting position to allow your body to move in one of these ways? Note: just because you can do a shape safely on the ground doesn’t mean you are ready to try it in the air. Many shapes up the pole require an increased load on the joints, and you should gradually prepare your body for this before trying the up-the-pole trick. This is where an experienced coach can help you determine if you’re ready or give you progressive exercises for the skill.
- If you’re still not able to achieve the shape up the pole, can you create a variation of the shape that you can do? Think about your limiting factor(s) and how you can vary the trick to accommodate (or appreciate!) these differences.
Have fun problem solving your wishlist pole tricks and analyzing all the variations. Please share what you come up with!
If you’re an instructor or student and you learned something from this blog, I would greatly appreciate a tip so I continue offering high-quality content! I’m on Venmo (@Jody-Ryker) and PayPal (guitars7nroses@yahoo.com). If you’re not able to give a tip, no worries! I always appreciate hearing from you or a testimonial.